Psychology suggests letting children play on their own may be one of the best parenting decisions
Contemporary children are engaging in far less independent playtime, which is essential for developing critical life skills. With the prevalence of organized sports and tightly packed schedules, these young ones miss out on vital moments of free exploration. This reduction is closely associated with increasing rates of anxiety and emotional difficulties among kids.

Hyderabads first Dot Cake Competition every baker is talking about
After six years of delighting thousands of followers behind a screen, Hyderabads popular food blogger Dr Ayesha Fatima aka @delish.eateria has officially taken her passion for good food offline. Marking the launch of her Delishs Cooking Club, Dr Ayesha brought the baking community together for the citys first Dot Cake Competition, which was held on Get the latest updates in Hyderabad City News , Technology , Entertainment , Sports , Politics and Top Stories on WhatsApp & Telegram by subscribing to our channels. You can also download our app for Android and iOS .
World-Renowned Mountaineer Nirmal Purja Confirmed Dead After Broad Peak Avalanche In Pakistan
For two days, the mountaineering world held its breath. On Saturday (1st August), that wait ended in heartbreak. Nirmal Nims Dai Purja, the Nepali climber who redrew the limits of human endurance by summiting all 14 of the world's 8,000-metre peaks
Teach your kids these survival rules before life teaches them the hard way
Parents ought to instill essential life skills in their children to help them navigate various challenges with confidence. By learning to handle rejection and develop competence, kids cultivate genuine self-assurance. Encouraging them to think critically enables them to identify truth amidst the noise of misinformation. Additionally, grasping emotional regulation and basic financial concepts is key for their overall well-being.
What is the best month to start a garden? Here's what experts say
If you've ever stood in a nursery holding a packet of seeds, unsure whether now is the right time to plant them, you're not alone. Turns out, the answer isn't really a guess; India's own agricultural institutions have been mapping this out for decades. The country's growing calendar is split into three official seasons: Kharif, Rabi, and Zaid a system the Ministry of Agriculture and Farmers Welfare and its associated bodies use to guide sowing nationwide. Each of these three cropping seasons is shaped by its own pattern of temperature, rainfall, and soil moisture, which is what actually determines when farmers, and home gardeners by extension, should be planting what. Institutions like the ICAR-Indian Institute of Horticultural Research in Bengaluru the country's premier body for vegetable and horticulture research, have long leaned on this framework to guide timing across the country. Here's what that seasonal logic actually means if you're trying to figure out your best month to start a garden.
Home renovations every property owner should plan after 10 years
Homes reaching ten years require attention to systems and materials. Proactive inspections and upgrades protect structural integrity and resale value. Kitchen and bathroom modernizations significantly influence buyer perception and market appeal. Exterior checks and HVAC replacements ensure efficiency and curb appeal. Addressing these areas preserves functionality and market competitiveness effectively.
Oscar Wilde's quote highlights fashion's constant alteration and its perceived ugliness. The trend cycle accelerates rapidly due to social media and influencer culture. Fashion's industry relies on consumers continually desiring new items. However, personal style and conscious consumption offer an alternative to fleeting trends. Ultimately, fashion's appeal lies in its evolving conversation and our curiosity.
If your day looks like one long stretch of sitting, laptop open, shoulders creeping toward your ears, back glued to the chair, you're far from alone. Most of us know the feeling by mid-afternoon: hips that feel locked up, a lower back that's had enough, and a stiffness that seems to settle in no matter how many times we shift positions. Doctors have long pointed out that sitting for extended periods shortens the hip flexors, weakens the core, and puts steady pressure on the spine. The fix, though, doesn't need to be complicated. A short yoga sequence, done at your desk or on a mat nearby, can loosen things up and reset your posture in about 10 minutes flat. Here are five poses worth adding to your routine.
Friendship Day 2026 Bucket List: 25 Things Every Best Friend Should Do Together
Two best friends of nineteen years have a rule: every Friendship Day, they do one thing they have never done together before. One year it was a pottery class. Last year, it was learning to ride a scooter together, in an
Dholeras wildlife: A hidden ecosystem of birds, grasslands and coastal life
Dholera's coastal landscape is a rich ecological zone with grasslands and wetlands. This region supports hundreds of bird species, including rare and endangered ones. Grasslands around Dholera host diverse fauna like wolves and blackbucks. The coastal area features mangroves, providing breeding grounds for marine life. Dholera showcases biodiversity in its natural habitats and its conservation value.
People who still read physical books have these 7 unique psychological strengths
Choosing print books reveals unique psychological strengths in readers. These readers often demonstrate sustained concentration and a preference for a physical journey. They value ownership and attach memories and identity to tangible objects. Understanding comprehension matters greatly to those who prefer paper. This preference reflects a deeper engagement with the reading experience itself.
August gardening guide: Which are the best seeds to sow this month
August offers a useful gardening window for warm-season vegetables and flowering plants. Okra and beans thrive in the monsoon humidity, providing quick harvests. Gourds also benefit from consistent moisture and can be grown vertically. Tomatoes started now will yield a good autumn harvest. Marigolds, zinnias, and cosmos offer colorful blooms for upcoming festivals.
Rashmika Mandanna's Hip Injury On Ranabaali, Mysaa Sets Forces Six-Week Break
Rashmika Mandanna was in the middle of an intense dance sequence when something in her hip gave way. The actress has reportedly suffered a serious hip injury while filming her upcoming projects, Ranabaali and Mysaa, according to multiple entertainment reports. She
5 plants that can grow in small pots and are suitable for small spaces
Living in a small house or apartment does not mean that there will be no green grass and plants. Even in the tiniest corner or on a shelf, one will manage to grow some plants to enjoy their beautiful appearance, benefit from their honey scent, and enjoy the clean air. It is necessary to choose wisely which plants to grow in small pots and conditions since there are several species that do not take much space, effort, and time.
After facing significant personal challenges, Ram Gopal Kothari emerged victorious, setting an extraordinary benchmark as the first Indian to complete a marathon at the Geographic North Pole. His journey isn't just marked by this monumental achievement, but also a history of thriving in business and exploring the globe. Kothari's story is one of relentless ambition and resilience, motivating countless others to chase their dreams against all odds.
Never die is obviously a bit of an exaggeration; every living thing has its limits, but there's a small, specific group of plants that come about as close to indestructible as houseplants get. These are the ones that survive missed waterings, forgotten corners, inconsistent light, and the kind of casual neglect that kills off more delicate greenery within weeks. What makes this particular list useful is that all five stay genuinely compact, fitting comfortably on a windowsill, desk, or small balcony shelf without demanding the space a larger plant would. If your track record with houseplants has been more failure than success, these five are about as close to a guaranteed win as gardening gets.
Commonwealth Games 2026: India Scripts History As Chopra And Yashvir Sweep Silver-Bronze In Javelin
Yashvir Singh had one throw left. One chance to turn a debut at the Commonwealth Games into something he would remember for the rest of his life. He took it - and sent the javelin out to a personal best of
Always saying sorry in your relationship? Here are 5 things couples should never apologize for
Healthy relationships are built on respect, honesty, and the freedom to be yourself, not on constantly walking on eggshells.
World Lung Cancer Day 2026: Never Smoked? You Can Still Develop Lung CancerHere's Why
World Lung Cancer Day, observed annually on August 1, shines a spotlight on one of the world's most common and deadly cancers while encouraging greater awareness, early detection, and timely treatment. Although lung cancer is often associated with smoking, experts say
5 Plants with red leaves to add a splash of colour to your home
Red foliage does something in a garden or balcony that flowers simply can't manage year-round: it holds its colour through every season, doesn't wilt after a week, and turns even a routine collection of green plants into something that actually catches the eye from across a room or a terrace. A single red-leafed plant placed against a backdrop of ordinary green foliage instantly becomes the focal point, no flowering required. Whether you're working with a shaded balcony corner or a sun-drenched terrace ledge, there's a red-leaf plant suited to nearly every Indian growing condition. Here are five worth considering.
Dead Snake Still Dangerous: Severed cobra head bites 72-year-old; experts urge immediate care
An Indian content creator shared an honest review of Spain's La Tomatina festival. She stated the experience did not match cinematic expectations from popular films. Gupta described the festival as physically demanding and overwhelming due to crowds and rotten tomatoes. Social media users shared mixed reactions, with some agreeing and others disagreeing. The creator advised attendees to manage expectations before visiting the event.
Scenic monsoon bus trips in India: Beautiful routes that should be on every traveller's bucket list
India's monsoon season offers scenic routes and vibrant destinations for travelers. The Bengaluru to Puducherry route provides coastal charm and French colonial influences. Bengaluru to Salem showcases lush countryside and serves as a gateway to hill stations. Chennai to Puducherry features dramatic coastal views during the rainy season. Journeys to Jaipur and Agra reveal Rajasthan's greener side and historic sites.
Challenge Completed In 48 Minutes: Creator finds 100 Indians in Times Square; Instagram reacts
A Mumbai content creator undertook a challenge in New York's Times Square. He aimed to count how many Indians he could find within one hour. The creator successfully identified one hundred Indians in just forty-eight minutes. This accomplishment quickly garnered significant attention and reactions on social media. Many users shared humorous comments and suggested similar challenges for him.
Does Rainwater Damage Your Hair? Heres What Science Says About Wet Hair Damage
Every monsoon, the same question resurfaces on salon floors and skincare forums: does getting caught in the rain actually damage your hair, or is that just something mothers say? The answer, according to hair science and environmental research, is more layered
10 baby names inspired by Greek mythology
Greek mythology has inspired art, literature and culture for thousands of years, and its influence extends to baby names as well. Many names rooted in ancient Greek myths remain popular today because of their timeless appeal and the inspiring stories behind them. From gods and goddesses to legendary heroes and noble figures, these names carry meanings associated with wisdom, courage, beauty and resilience. Here are 10 Greek mythology-inspired baby names that continue to be cherished by parents around the world.

Circus to concert: 6 big events happening in Hyderabad on Aug 1, 2
Looking for something fun to do this weekend? From live concerts and stand-up comedy to a wellness morning by Hussain Sagar, Hyderabad has something for every mood. Whether you want to dance, laugh, relax or spend quality time with friends, here are six exciting events happening across the city this weekend. 1. Ritviz Live at Get the latest updates in Hyderabad City News , Technology , Entertainment , Sports , Politics and Top Stories on WhatsApp & Telegram by subscribing to our channels. You can also download our app for Android and iOS .
The Bhagwan Birsa Biological Park successfully incubated Spectacled Cobra eggs artificially. Five healthy hatchlings emerged after a seventy-day incubation period under controlled conditions. The park also welcomed eight Sand Boa hatchlings during this conservation initiative. This success highlights the importance of scientific management in reptile breeding programs. The hatchlings are now under close observation and veterinary care.
Monsoon Health Alert: Fevers, Viral Infections And PneumoniaWhat An Expert Wants You To Know
The monsoon brings welcome relief from scorching summer temperatures, but it also marks the beginning of a season when infections become increasingly common. From viral fevers and mosquito-borne diseases to respiratory illnesses, the rainy season creates the perfect conditions for germs
Is your child being a good friend? Unhealthy friendship habits parents shouldn't ignore
Parents must teach children to avoid making friends feel less valuable. Children should celebrate friends' successes instead of feeling jealous. Honesty should be delivered with kindness, not as hurtful criticism. Respecting personal boundaries and saying no is crucial for true friendships. Genuine care, not convenience, forms the basis of healthy relationships.

Experience Burmas traditional tea shop in Hyderabad this August
Step off a bustling street in Yangon and into the gentle hum of a local laphet yay tsain, a traditional Burmese tea shop, where the air is thick with the aroma of freshly pulled black tea and rich spices. Conversations flow effortlessly across wooden tables as regulars tear into flaky flatbreads, dipping them into fragrant Get the latest updates in Hyderabad City News , Technology , Entertainment , Sports , Politics and Top Stories on WhatsApp & Telegram by subscribing to our channels. You can also download our app for Android and iOS .
Scientists are using GPS collars to track elusive snow leopards in the Himalayas. This technology helps understand their movements and habitats for better conservation. India's recent assessment estimated 718 snow leopards across its Himalayan regions. These big cats inhabit harsh terrains, making research incredibly challenging for scientists. Tracking efforts aim to protect these animals and their fragile mountain ecosystems.
Why Stanza Living Is the Preferred Choice for Students and Working Professionals
Finding a place to live away from home is one of the most stressful parts of moving to a new city. Between unreliable landlords, hidden costs, safety concerns, and the sheer hassle of setting up a household from scratch, the search
The Hidden Cause Behind Chronic Stomach Issues: What Patients Often Mistake for Gas and Acidity
Mild acidity after a heavy meal is common enough to ignore. But when the burning, bloating or discomfort keeps returning week after week, most patients still reach for an antacid rather than a diagnosis - and that habit can let conditions
Yoga For Liver Health: Grand Master Akshar Shares Daily Poses To Try
The liver is one of the most active organs in the body. It aids digestion, stores energy, nourishes the body, and plays a vital role in several metabolic processes. As one of the body's key organs, it is essential for maintaining
A Danish traveller took to the internet to share her debut experience aboard an Indian overnight train. She described the complexities of securing tickets, initially only managing to confirm one. Her companions found themselves squeezed together on a single berth until helpful railway personnel arranged for more space. The adventure transformed into a cherished cultural encounter for the group, filled with delightful surprises.
These 8 ancient Indian foods were considered medicine before modern nutrition existed
Centuries later, modern nutrition has begun to explain why many of these everyday ingredients earned such an important place on the Indian plate. While no food is a miracle cure, several ancient staples are now recognised for their impressive nutritional value and health-supporting properties. Here are eight Indian foods that were quietly treated like medicine long before modern science caught up.
Natural home fragrances offer a pleasant alternative to synthetic sprays. The simmer pot method uses simple kitchen ingredients to create pleasant aromas. Water and spices gently simmer on the stove, releasing natural scents throughout the home. This technique is easy, inexpensive, and avoids artificial chemical fragrances entirely. Safety precautions are essential when using an open pot on the stove.
How to burp a baby correctly: Different positions that actually work
Babies often swallow air during feeding, which can cause discomfort and fussiness. Burping helps release this trapped air, aiding their immature digestive systems. Parents can try various positions like over the shoulder or on the lap. Observing cues such as squirming or crying indicates a need for burping. Finding the right method ensures a comfortable and settled infant.
10 best indoor plants that naturally reduce excess humidity during monsoon
Before you throw out old glass jars, try these 7 DIY ideas for your kitchen, garden, and home
We all have some empty sauce jars or used pickle bottles sitting in our kitchen, just waiting to be disposed of.But before you think of throwing them into the trash, pause for a second, as they can be reused creatively and help to decorate your home in a budget-friendly manner.You don't need fancy tools or a big budget to give them a second life. A little soap, water, and imagination are all it takes to turn a plain jar into something genuinely useful.Here are five simple ways to repurpose it in your kitchen, garden, and home:
7 of the world's oldest restaurants that have been serving food for over 500 years
They are living pieces of history, where recipes have been passed down through generations and dining rooms have welcomed everyone from merchants and monks to artists, royalty and curious travellers. Here are seven of the world's oldest restaurants that have continued serving food for more than 500 years.
Why Spain's tiny enclave of Ceuta is at the centre Of Europe's migration crisis
Ceuta, a Spanish territory in Africa, faces a migration crisis as thousands attempt entry. Migrants seek safety and better lives, risking perilous journeys across the Mediterranean. Morocco disputes Spain's claim over Ceuta, complicating border control efforts. Recent border collapses highlight the ongoing struggle over migration into Europe. This enclave serves as a critical gateway for those reaching European Union territory.
Choosing a preschool? Ask these 10 questions during a school tour before you decide
When choosing a preschool, parents must delve deeper than just the vibrant classrooms. Essential inquiries can uncover the school's educational philosophy and operational routines. It's important to grasp the quality of teacher training and safety protocols, as these elements greatly impact a child's growth. Preschools should nurture creativity and critical thinking skills, ensuring children are prepared for the future.
Etihad Airways and Air Arabia have cancelled select flights to Bahrain and Kuwait. This disruption stems from the evolving regional security situation and increased Middle East tensions. Passengers are strongly advised to verify their flight status before travelling to the airport. Many Indian travellers use UAE airports as transit hubs for onward journeys. Further schedule revisions are possible if the security situation changes.
Dont buy expensive planters: 7 household items you can turn into beautiful garden containers
Transforming common household items into beautiful garden planters offers an economical approach. Old tea cups and tin cans can easily become homes for small plants. Plastic bottles and old buckets provide flexible and larger options for various plants. Wooden crates and old bowls are suitable for multiple plants or decorative purposes. Wicker baskets enhance plant aesthetics, making gardening accessible and stylish.
6 traditional Pahadi dishes every food lover should try at least once
Unlike heavily spiced restaurant fare, Pahadi dishes celebrate natural flavours, slow cooking and ingredients that have sustained mountain communities for generations. If youre looking to experience the true taste of the hills, these six traditional dishes deserve a place on your culinary bucket list.
Quote Of The Day: Shaw says art softens harsh reality; offers relief in digital burnout
George Bernard Shaw believed art offers essential perspective on life's difficulties. His insights remain relevant as modern existence often feels personally empty. Art provides a necessary pause from constant digital engagement and daily pressures. It helps individuals process emotions and notice beauty in their surroundings. This artistic engagement makes the world more bearable and human.
Risks Of Newspaper Food Wraps: FSSAI warns ink can contaminate snacks; switch to food-grade packs
Newspaper ink is composed of various chemicals that can seep into food, leading to potential health risks, particularly when in contact with hot and greasy meals. One major concern highlighted by food safety experts is the presence of mineral oil hydrocarbons found in inks. To prioritize safety, they advise opting for certified food-grade packaging materials, ensuring better protection against harmful chemical exposure and promoting long-term health.
A security guard shared a video of his company's affordable lunch for just ten rupees. The meal, which included papad, karele ki bhujia, sabzi, rice, and dal, surprised many viewers. Online users praised the company for providing such a substantial and inexpensive meal to its employees. Some commenters inquired about job openings while others appreciated the food's presentation. The video highlights the value of affordable workplace meals in today's economy.
Amidst the relentless barrage of content in modern society, many find themselves entrapped in a cycle of comparison, leading to feelings of inadequacy. Sadhguru proposes cultivating an inner depth to lessen the weight of external judgments. By developing this internal foundation, individuals can enhance their self-esteem and genuinely celebrate others' accomplishments without feeling threatened, countering the stress that comes with today's digital landscape.
Infant vaccination schedule in India: A month-by-month guide every parent should know
Vaccination provides essential protection for infants against life-threatening diseases. India's Universal Immunization Programme offers free vaccines to protect children. The first vaccines are given at birth, establishing a crucial immune foundation. Subsequent visits at six weeks and later build stronger immunity against various illnesses. Understanding this schedule helps parents ensure their child's well-being.
Laid off after 10 years, Reddit user reveals how AI helped land a Rs 1.5 crore job
A professional secured a new job after an unexpected layoff and a lengthy search. Artificial intelligence tools significantly aided interview preparation and response crafting. The user pasted job descriptions and interviewer details into AI for tailored practice. This strategic preparation led to a job offer with a substantial salary and benefits. The experience highlights AI's evolving role in modern job seeking strategies.
This Indian city is called the Golden City, but the reason has nothing to do with gold
Jaisalmer, India's Golden City, earned its name from yellow sandstone buildings glowing in sunlight. The historic Jaisalmer Fort, built in 1156 AD, remains a living settlement today. This desert city once thrived as a vital stop on ancient trade routes. Its narrow lanes and old structures preserve centuries of regional history and traditions. Jaisalmer represents the enduring culture of Rajasthan through its crafts and festivals.
A former California teacher moved to Portugal in 2021 seeking affordability. She found a better standard of living and purchased two apartments there. This relocation provided financial breathing room and a renewed sense of direction. She is now applying for Portuguese citizenship and feels a deep sense of belonging. Her journey reflects a growing trend of Americans seeking international retirement options.
7 Fast-growing plants that provide natural shade and keep your home cool
Greenery cools homes significantly through direct shading and evapotranspiration. Fast-growing climbers and screening plants offer immediate cooling benefits. Money plant, curtain creeper, and morning glory provide rapid shade coverage. Bougainvillea and passion fruit vines offer dense canopies and color. Bamboo screens and areca palms provide effective living walls against heat.
Japanese bento boxes and Indian tiffin containers present unique culinary journeys. While bento emphasizes aesthetic presentation and meticulous organization for nutritious meals, Indian tiffins celebrate hearty flavors and a rich assortment drawn from traditional kitchens. Both styles embody the essence of family legacies and cultural roots, showcasing the joy of home-cooked meals that connect generations.
Optical illusion personality test: What you see first reveals your hidden superpowers and weaknesses
Optical illusion personality tests trick the brain into believing what is spotted first when there are actually many objects hidden in one, so that different people notice different things depending on how their brain processes what they see.However, science doesnt claim to reveal any personality traits but optical illusion personality tests give a fun respite and suggest quirky clues about your personality.This personality test here claims to reveal hidden personality traits about yourself based on what you see first!So, take the testWhat did you see first?
10 baby names inspired by Celtic legends
Many parents look to mythology for baby names that are rich in history, meaning and timeless appeal. Celtic legends, passed down through Irish, Scottish and Welsh traditions, are filled with brave warriors, wise rulers, magical beings and powerful goddesses whose stories continue to inspire generations.

This Hyderabad exhibition celebrated Basava through 30 years of art
For centuries, the Basava (bull) stood at the very center of Deccani agrarian life as an indispensable partner in tilling the soil and providing organic manure. Today, as tractors replace livestock and chemical fertilizers alter farming ecosystems, the quiet presence of the Basava is steadily fading from rural landscapes. A solo exhibition at the Chitramayee Get the latest updates in Hyderabad City News , Technology , Entertainment , Sports , Politics and Top Stories on WhatsApp & Telegram by subscribing to our channels. You can also download our app for Android and iOS .
Pacifiers can comfort babies and potentially lower SIDS risk. Non-nutritive sucking aids premature babies in feeding and hospital discharge. Prolonged pacifier use after eighteen months may affect dental development. Frequent use after one year can increase middle ear infection risks. Parents should consider their baby's needs when deciding on pacifier use.
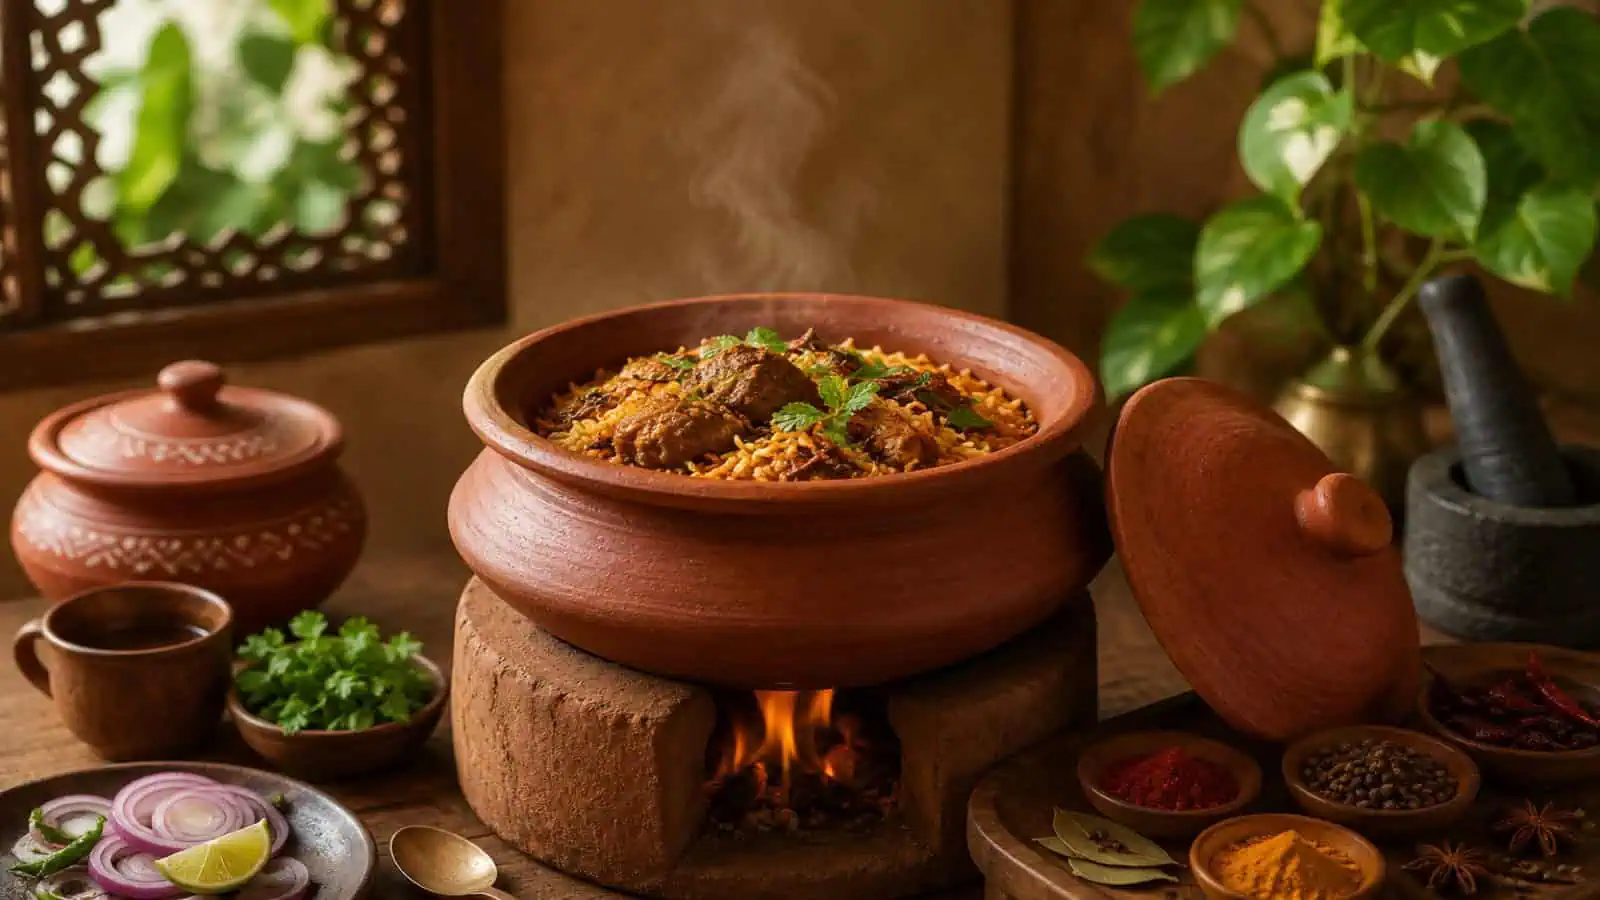
Back to the roots: Why clay pot cooking is making a comeback
As modern kitchens fill up with air fryers, non-stick pans and smart appliances, one ancient cooking method is quietly making a comeback. Clay pot cooking, once a part of everyday life in Indian homes, is returning as more people seek healthier meals, richer flavours and sustainable living. In Hyderabad, where the famous dum biryani has Get the latest updates in Hyderabad City News , Technology , Entertainment , Sports , Politics and Top Stories on WhatsApp & Telegram by subscribing to our channels. You can also download our app for Android and iOS .

Friendship Day 2026: 8 events in Hyderabad you cannot miss
If theres one thing Hyderabadis take seriously, its weekend plans. And when you mix a Sunday with Friendship Day, staying at home is not an option. This year, local organisers, cafes, and creative collectives are stepping up with an impressive lineup of events tailored for every kind of friend group. Looking to trade routine plans Get the latest updates in Hyderabad City News , Technology , Entertainment , Sports , Politics and Top Stories on WhatsApp & Telegram by subscribing to our channels. You can also download our app for Android and iOS .
Montessori, play school, preschool or nursery: Understanding the differences
Parents are presented with various options for early childhood education. Play schools are ideal for toddlers who are transitioning from home, facilitating interaction with peers. Preschools implement a balance between structured learning and play, catering to young children's needs. Nurseries, often part of preschools, concentrate on establishing routines and foundational skills, while Montessori environments promote independence through mixed-age learning.
Many houseplants come with their own little mythology attachedlucky bamboo tucked onto office desks, money plants trained to climb living room walls, all chosen as much for what they're believed to bring as for how they look. Cultural beliefs and traditional practices have kept these plants in circulation for generations. But step past the symbolism for a moment, and it's clear several of them have earned their popularity the old-fashioned way too, through genuine, practical usefulness. Some quietly improve indoor air, some ask for almost nothing in return, and a few even double up as something you can use in the kitchen or on your skin. Belief in luck or not, these five plants hold their own.
Miza Nazili, a Singaporean entrepreneur, candidly shared her transformational journey from financial struggle to thriving business success in an inspiring Instagram post. She recounted how her family battled significant debt and her own job loss, fueling her motivation to escape poverty. Her reflections on overcoming adversity resonated widely, earning appreciation from users who admired her honesty about the arduous path to entrepreneurship.
Humans often travel to reconnect with places and past memories. Familiar destinations reduce cognitive load and mental effort for travelers. These places become extensions of personal identity and evoke strong emotions. Nostalgia significantly increases travelers' intentions to revisit cherished destinations. Repeat visits offer emotional restoration and psychological comfort to many.
Dhonis Butter Chicken Habit: Uthappa reveals gravy-only indulgence; fans see relatable discipline
MS Dhoni exemplifies discipline when it comes to his diet, relishing his beloved butter chicken while cleverly sidestepping the meat itself. He delights in the rich gravy, illustrating a harmony between indulgence and fitness. This unique culinary choice offers a glimpse into Dhoni's authentic nature, garnering admiration from fans across the globe who appreciate his balanced, grounded lifestyle.
The Vande Bharat Express offers a scenic journey across the Chenab Rail Bridge. Passengers experience misty mountain views and deep gorges during the monsoon season. This semi-high-speed train connects Shri Mata Vaishno Devi Katra with Srinagar efficiently. The Chenab Rail Bridge stands as the world's highest railway arch bridge. This route showcases India's engineering brilliance and natural beauty.
A new duplex penthouse at London's Chelsea Barracks is now for sale. This luxury property is listed for forty-eight million pounds, making it very expensive. The development transformed a historic British Army barracks into a high-end residential neighborhood. Buyers can move into the fully furnished home which includes extensive outdoor terraces. This listing highlights London's ultra-prime housing market's renewed momentum.
Food safety starts young: Lesson from Mumbai pasta case
A Mumbai parent's social media post revealed a cockroach in children's pasta. This incident highlights the importance of teaching children about food safety habits. Young children are more vulnerable to foodborne illnesses due to developing immune systems. Parents can empower children to trust their instincts and speak up about concerns. This teaches children responsible behavior and protects their health.
6 Indian dishes that are over 1,000 years old and still loved today
From fermented rice-lentil batters to sweet offerings prepared for deities, these recipes have stood the test of time and continue to be a part of everyday meals across the country. Here are six Indian dishes that are believed to be more than 1,000 years old.
Snakes that look like dry leaves and twigs: Nature's most convincing disguise artists
Camouflage in the animal kingdom is often about blending into a colour or a general shape, but a small, remarkable group of snakes has taken the game several steps further, evolving to mimic the exact texture, shape, and even movement of dead leaves and twigs. It's a survival strategy that works both ways, staying invisible to predators overhead while also letting these snakes sit motionless and ambush unsuspecting prey that wanders within striking distance. Some of these species live in the same Indian forests, scrublands, and even garden edges that many readers walk past every day, which makes recognising them more than just a nature-trivia exercise. Here are seven of the most convincing brown, dry-leaf-and-twig mimics found around the world.
Eucalyptus trees, native to Australia, spread globally during the 1800s for perceived benefits. These trees were believed to cure diseases and generate profit. However, their rapid growth and water consumption caused environmental issues. They also contributed to soil degradation and increased wildfire intensity. Dense eucalyptus plantations negatively impacted biodiversity and local ecosystems.
Extensive traffic restrictions are in place for the Kanwar Yatra pilgrimage. Heavy vehicles will be barred from July 30 on the Delhi-Haridwar highway. All vehicle movement will cease from August 4 to August 12. Authorities have intensified safety arrangements and police deployment along the routes. Travelers should check advisories and allow extra travel time.
From Attack on Titan to Dandadan: Anime every Kaiju No. 8 fan should stream
Gardeners often place soap near tomato plants to deter pests. Strongly scented soap is believed to confuse insects and browsing animals. Horticultural experts state this method has clear limitations and limited scientific support. Healthy tomato crops benefit more from regular inspection and proper watering. Proven methods and registered insecticidal soaps offer more reliable crop protection.
Make your own natural garden pest spray: 5 DIY recipes and the plants you should never spray them on
Homemade garden sprays offer a natural alternative to chemical pesticides for pest control. However, these DIY solutions can damage plants if applied incorrectly. Always test any homemade spray on a small plant patch first. Certain plants are sensitive to specific ingredients like soap and oil. Proper application timing and plant condition are crucial for success.
Obamas 6:30 Pm Family Rule: President puts dinner before politics; routine keeps life normal
Despite the weight of his presidential responsibilities, President Obama made family dinners a priority every evening at 6:30 PM. He emphasized the importance of being present for meals and homework, showing a steadfast commitment to family life. This cherished tradition fostered connection and stability for his daughters, allowing them a semblance of normalcy in the extraordinary environment of the White House.
Life's unpredictable voyage requires constant flexibility and calm adaptation. Frida Kahlo's words emphasize that nothing remains absolute or permanent. This natural flow means both difficult and happy phases eventually change. Accepting this unavoidable truth reduces anxiety and fear of the unknown. Endings become transitions, and setbacks are seen as temporary occurrences.
Breakfasts from 12 countries that look nothing alike
Climate, culture, agriculture and centuries of tradition have shaped breakfast tables in fascinating ways, proving that there is no universal definition of a proper morning meal. Heres a look at 12 breakfasts that couldnt be more different from one another.
International Tiger Day raises awareness about tiger conservation challenges. Leaders committed to doubling wild tigers by 2022 after a 2010 summit. India now holds most wild tigers, thanks to Project Tiger initiatives. Habitat loss and poaching remain significant threats to tiger survival. Community involvement and funding are crucial for continued conservation success.
Our sense of self often relies on external factors and societal roles. Adi Shankaracharya taught that true happiness comes from understanding our inner being. He advised practicing discrimination between the permanent Self and the temporary ego. The ego is built from our body, mind, and possessions, leading to distress. Recognizing the One-Self as Pure Being brings steady inner peace and joy.
Your balcony railing is wasted space: 5 DIY ways to turn it into a vertical garden
Most balconies have one long, sun-drenched strip of unused real estate running right along the edge, the railing and yet it rarely gets treated as anything more than a place to dry clothes or lean against. For anyone short on floor space, that railing is actually prime growing territory, catching more direct sunlight through the day than the shadier corners further back on most balconies. With a little creativity and a few inexpensive materials, that same stretch of metal or concrete can turn into a genuinely lush vertical garden without eating into your already limited floor area. Here are five DIY ways to put it to proper us
Steve Jobs' life offers inspiration through overcoming significant setbacks. He co-founded Apple and built Pixar into an animation powerhouse. Jobs believed great work stems from loving one's chosen profession. He advised graduates to actively search for their true calling. Settling for unfulfilling work is a poor long-term strategy, he stated.
The Kenzo flower, also known as Padamchal, grows at high altitudes in the Himalayas. This rare alpine bloom that take years to produce a single flower. It survives harsh conditions and is valued for its medicinal properties by local communities. Visitors can spot this remarkable plant in various locations across the Indian Himalayas. Conservation efforts are crucial as its habitat faces potential shrinkage due to rising temperatures.